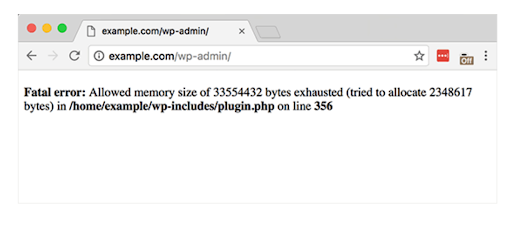
If you are a WordPress user, then you might have experienced this message coming on your screen telling you your allowed memory size is exhausted. It means that your memory has reached the limit. It will cause your website not to work properly. Your hosting allocates the memory. But if the website exceeds that limit, it will cause slow-loading pages, failed updates, and even your site can completely crash.
Most WordPress issues require technical experience, but luckily, this issue is the most common and simplest.
Here, we will explain three easy ways to solve this issue so that anyone, even a beginner, can solve it.
Recommended WordPress Memory Limit (Best Practices)
Different types of WordPress websites require different memory limits depending on traffic, plugins, themes, and functionality. Setting the correct memory limit ensures smooth performance, faster loading, and fewer errors.
Below are the recommended WordPress memory limits based on website type:
| Website Type | Recommended Memory Limit |
|---|---|
| Simple Blog or Portfolio Website | 128M |
| Business or Corporate Website | 256M |
| WooCommerce Store | 256M – 512M |
| Elementor / Page Builder Websites | 512M |
For basic blogs or static websites, 128MB of memory is usually enough. However, if your website uses multiple plugins, custom themes, or page builders, a higher memory limit is necessary.
WooCommerce stores and Elementor-based websites consume more memory due to dynamic content, cart functionality, and heavy scripts. For these sites, setting the memory limit to 256MB or higher is strongly recommended.
Extra Tip: If increasing the memory limit does not resolve the issue, your hosting provider may be restricting server resources.
Method 1: Increasing Memory Limit via wp-config.php
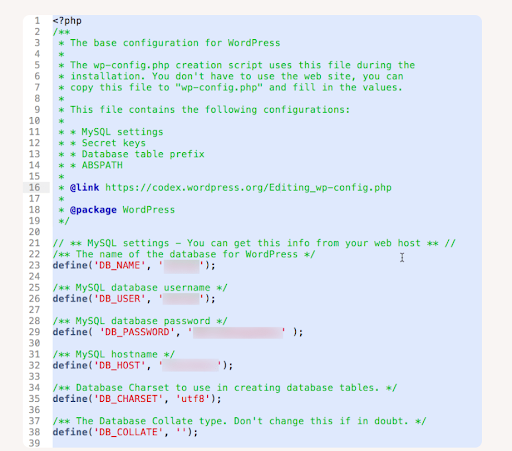
The wp-config.php is the core WordPress file containing all the information needed to make your website work. It provides the base configuration setting for your website, including memory. Here is how you can increase your memory using this file.
Step-by-Step Guide to Edit wp-config.php
Step 1:
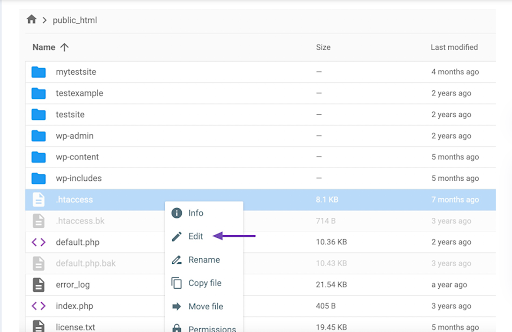
- Find the wp-config.php file in the root directory of your WordPress installation. It is often found in the public_html folder.
- Access your website files using FTP or the hosting provider’s file manager.
FTP (File Transfer Protocol)
Use any FTP client, connect your hosting account and navigate through your website files.
Your hosting provider’s file manager
Hosting providers often offer a built-in file manager within their control panel.
Step 2:
Now, we will edit the wp-config.php file.
- Before making any changes, it is very important to create a backup file.
- Then right-click on the wp-config.php file and choose “Edit.”
- Now, find a specific line of code within the text.
- Above this line, you will add a specific line of code that will define the memory limit. The line can be like define(‘WP_MEMORY_LIMIT’, ‘256M’);

- You can set any higher value, but always consult your hosting provider before doing this.
Step 3:
- Save the changes that you have made.
- Now, visit the website to check if the issue has been resolved.
Common Issues
- Mostly, hosting does not allow you to change the memory to a higher number.
- This method can be a temporary solution in some cases.
Benefit
The benefit of using this method is that you directly change the memory without any plugin. You go to the file and change the code defining the memory.
Read more: How to Add PHP Code to Elementor Page?
Method 2: Increasing Memory Limit in .htaccess
The .htaccess is the shorter form of hypertext access. It is the configuration file used by Apacha’s based web servers. It provides instructions on how the web server should handle various requests. You can also solve the memory issue using this file.
Step-by-Step Guide to Edit .htaccess
Step1:
- Access the website file using the FTP or file manager, which we have discussed above.
- The .htaccess file can also be hidden, so enable FTP or file manager to show the hidden files.
Step 2:
- First, create a backup.
- Then right-click on the .htaccess file and choose “edit.”
- Now add this line of code php_value memory_limit 256M and change the 256M with your desired memory.

Step 3:
- Save the changes.
- Visit your website to see if the issue has been resolved.
Benefits:
- If you do not have access to the PHP file, you can use this method to solve the memory issue.
- If you do not edit the file correctly, it will cause issues.
If The issue is not resolved?
If the issue is not solved, then you might not have edited the file correctly, or the hosting restricts you to increase the memory. You should contact your hosting provider to solve the issue.
Method 3: Increasing Memory Limit in php.ini
The php.ini is a special type of php file that has different settings. You can change the settings accordingly. Creating or modifying a php file to change settings is unnecessary. You can also adjust the memory limit in this file.
Step-by-Step Guide to Edit PHP.ini
Step 1:
First, you have to locate your php. inni file. The location depends on the hosting provider and server setup.
So there can be different locations:
- Hosting Control Panel
- Root Directory of Your Server
- Specific Configuration Directory
- Sometimes, you must also create the php.ini file in your WordPress root directory.
Step 2:
- First, create the backup.
- Then, open the PHP file.
- Find the line that includes “memory_limit=.” Now adjust the line according to your choice. If the line is not there, add it.
Step 3:
- Save the changes.
- Now restart the web server and check if the issue has been resolved. You can get help from your hosting provider for this step.
Common Issues
Some hostings limit access to the php setting. You can connect with your hosting provider if you are restricted.
Hosting Limitations That Affect WordPress Memory Limit
In many cases, increasing the WordPress memory limit does not work because of hosting-level restrictions. Your hosting provider controls the maximum resources your website can use, regardless of the settings you apply in WordPress files.
Below are the most common hosting limitations you should be aware of:
Shared Hosting Restrictions
Shared hosting plans allocate limited server resources to each website. Even if you set a higher memory limit in wp-config.php, .htaccess, or php.ini, the server may override it. This is one of the most common reasons why memory limit changes do not take effect.
Managed WordPress Hosting Limits
Managed WordPress hosting providers often enforce strict memory limits for performance and security reasons. These limits are usually predefined and cannot be changed manually. In such cases, you must contact the hosting support team to request an increase.
When Increasing Memory Won’t Work
If you have already tried all three methods and the error still appears, it usually means:
- Your hosting provider has capped the memory limit
- Your website is using poorly coded plugins or themes
- Server resources are insufficient for your website’s needs
Increasing memory alone will not fix performance issues caused by bad plugins or heavy themes.
When You Should Upgrade Your Hosting
You should consider upgrading your hosting plan if:
- Your website uses WooCommerce or page builders like Elementor
- Your site receives high traffic
- You frequently face memory-related or performance issues
- Your hosting provider does not allow memory limit increases
Upgrading to a better hosting plan can significantly improve stability, speed, and overall website performance.
Pro Tip: Always choose a hosting provider that offers scalable resources and responsive support for WordPress websites.
How to Avoid Exhausting Your WordPress Memory
These are pro tips to save the memory:
Deactivate unused plugins
Usused plugins can take a huge memory. So, always check your installed plugins after a few days and deactivate those you are not currently using. It will save a huge memory.
Optimize Images
Large images can also cause memory issues. It would help if you used an image optimizer to optimize your large photos so they do not take up too much space by compressing the images.
Use a caching plugin
The caching plugin stores the website’s date. So, WordPress does not have to be regenerated on every visit. This will significantly improve the performance of the website.
Conclusion
Managing memory is crucial because the website can crash if you have reached the limit. If this happens, then your users will not be able to get your site. It is very important and easy to solve memory issues. You can choose any method that suits you. You can also contact your hosting provider if they have applied some restrictions to you. The above three methods help you to solve the memory issue in a short period.